Posts

Automating JBoss Installation on AWS EC2 Instance with User Data Script

  This script automates the installation and configuration of JBoss EAP on an AWS EC2 instance, ensuring that all necessary components are installed, configured, and managed as a service. By using this script as user data when launching an EC2 instance, you can streamline the deployment of JBoss EAP in your environment The Script Here's the complete script: #!/bin/bash # Create directory for JBoss packages sudo mkdir -p /opt/jboss/package # Sync JBoss package from S3 aws s3 sync s3://jboss-package /opt/jboss/package # Ensure that your Yum repository metadata is up to date sudo yum clean all sudo yum makecache # Install JAVA 1.8 (Amazon Corretto) sudo yum -y install java-1.8.0-amazon-corretto.x86_64 # Update the system sudo yum -y update # Change to the JBoss package directory cd /opt/jboss/package # Verify that the installer and XML configuration files exist if [ -f "/opt/jboss/package/jboss-eap-7.4.0-installer.jar" ] && [ -f "/opt/jboss/package/auto.xml"

Tomcat Upgrade Steps on Windows.

  Tomcat  Upgrade Steps on Windows. 1, Stop the older version of  Tomcat  service 2, Disable the service 3. Install the new  tomcat  version 4, backup the root webapps index file 5, copy the applications folder to webapps 6, compare the server.xml from older to new and then update the server.xml file in  tomcat  lates version 7, Add factory setting for password encryption in  tomcat  server.xml 8, copy the lib jar files to new  tomcat  lib 9, Edit the  tomcat  properties, JVM, JAVA Class path, JAVA Options, Initial memory pool, Maximum memory pool and local system account 10, Make it automatic and start the new  tomcat  service 11, Make sure application is woking after application team validation 12, uninstall the older version of  tomcat  and make sure you don't delete the folders. Note : These are the steps to be coordinated with application team, and make sure application compatible with the upgraded version during the planning phase. 

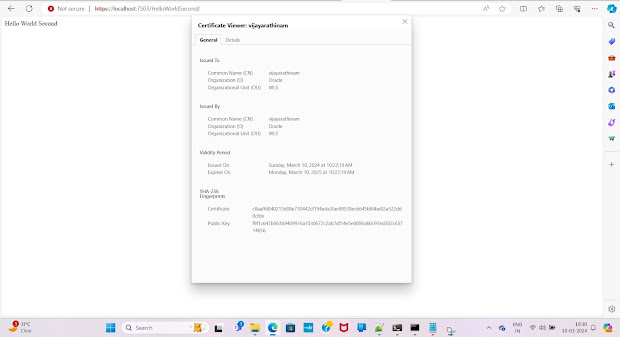
Self-Signed SSL Certificate For Weblogic

Image
Self-Signed SSL Certificate for Weblogic To create a self-signed cert: keytool -genkeypair -alias vijay -keyalg RSA -sigalg SHA256withRSA -keysize 2048 -validity 365 -dname "cn=www.vijayarathinam.com, ou=WLS, o=Oracle, c=IN" -storepass password -keystore identity.jks keytool -export -alias vijay -file root.cer -keystore identity.jks -storepass password keytool -import -alias vijay -file root.cer -keystore trust.jks -storepass password -trustcacerts -noprompt  Below are the steps to configure with Weblogic Server: Step 1 : Login to Weblogic Admin console --> Environment --> Servers --> < server_name_where_ssl_has_to_be_configured > --> Configuration -> General --> SSL Listen Port Enabled ( Check ) Note : The default SSL Listen Port would be 7002, change it if required.  Step 2 : Click on Keystores tab under " Configuration " tab : Step 2a : Click on the drop-down menu next to Keystores and select "Custom Identity and Custom Trust"  S

SSL Certificate for WebLogic CA Singed

  SSL Certificate for WebLogic CA Singed Cert: Create a key store database: [root@localhost]# /opt/java/bin/keytool -genkey -alias lac -keystore key_weblogic.jks -storetype jks -keypass changeit -storepass changeit What is your first and last name?  [Unknown]: www.vijayarathinam.com What is the name of your organizational unit?  [Unknown]: IT What is the name of your organization?  [Unknown]: ITO What is the name of your City or Locality?  [Unknown]: Chennai What is the name of your State or Province?  [Unknown]: TN What is the two-letter country code for this unit?  [Unknown]: IN Is CN=www.vijayarathinam.com, OU=IT, O=ITO, L=Bengaluru, ST=KA, C=IN correct?  [no]: yes   To create a Certificate Signing Request: [root@localhost]# /opt/java/bin/keytool -certreq -alias vijay -keystore key_weblogic.jks -file lac_certreq.csr Enter keystore password:  [root@localhost]# ls vijay_certreq.csr lac_certreq.csr [root@localhost] Email this to your third party CA: Once you get a reply back from the C

WebLogic Horizontal Cluster Setup

 WebLogic Horizontal Cluster Setup For Horizontal Cluster we need to make sure that we run pack & unpack commands Pack is to create a jar file out of the existing domain on the local server (wls-node01).  Once completed Copy the same to the Remote Server (wls-node02). Then install Weblogic / if already installed remove the exiting domain. You can unpack the same on the server. Start the Admin server on (wls-node01). Start the Node Manager on (wls-node01). Start the Node Manager on (wls-node02). Add the NM of (wls-node02) to the (wls-node01) Admin Server using Admin Console. Try to monitor the NM of the (wls-node02) from the (wls-node01) Admin Console. Adding server to(wls-node02) machine from (wls-node01) Admin Server. Starting these servers on the (wls-node02). Enroll From (wls-node02) to (wls-node01). Starting these Server on (wls-node02) machine from the(wls-node01) admin console. Packing: Go to: cd /opt/Oracle/Middleware/Oracle_Home/wlserver/common/bin Run the pack command: [wl

WebLogic 12c Installation/Uninstallation Using CLI Mode:

 WebLogic 12c Installation/Uninstallation Using CLI Mode: To Install: You need to do the installation with the inventory location: /opt/Oracle/oraInventory/oraInst.loc $ mkdir -p /opt/Oracle/oraInventory/ $ vi /opt/Oracle/oraInventory/oraInst.loc Enter the following values in the above oraInst.loc: inventory_loc=/opt/Oracle/oraInventory/ inst_group=wlsuser Execute the command: $ cd /opt/software/WLS/ $ /opt/java/bin/java -jar fmw_12.1.3.0.0_wls.jar -silent -responseFile /opt/software/SCRIPTS/12c_repository_file.xml -invPtrLoc /opt/Oracle/oraInventory/oraInst.loc To uninstall: Stop All the running services: Remove the Weblogic First: rm -rf /opt/Oracle/Middleware/ Remove the Oracle Inventory: rm -rf /opt/Oracle/oraInventory/ Good Luck Vijayarathinam

JAVA For WebLogic

 JAVA For WebLogic: Major Providers of JAVA: Sun JDK Sun java for Weblogic 12c & Tomcat IBM JDK IBM Java for Websphere JRockit JDK Oracle java for weblogic 8x 9x 10x 11x Open JDK Redhat java for JBOSS JROCKIT as our JAVA. Version 1.6 Sun JDK as our JAVA. Version 1.7 JAVA Installation: CLI Go to the location. cd /opt/software/java  Extract the tar file of the JDK 1.7.0_51 $ tar -xvf java_1.7_64.tar JAVA Installation: $ tar -xvf java_1.7_64.tar $ mv /opt/software/java/java /opt/ Uninstallation of Java /opt/java:  $ rm -rf /opt/java Post installation of JAVA: Checking the version of JAVA: $ /opt/java/bin/java -version java version "1.7.0_51" Java(TM) SE Runtime Environment (build 1.7.0_51-b13) Java HotSpot(TM) Client VM (build 24.51-b03, mixed mode) Setting up Environment Variable for JAVA: $ set PATH=/opt/java/bin/:$PATH $ export PATH=/opt/java/bin/:$PATH $ java -version java version "1.7.0_51" Java(TM) SE Runtime Environment (build 1.7.0_51-b13) Java HotSpot(TM)